Monday, February 28, 2011

...messing around with color.

I've been working with a lot of detail and realism lately, so I checked out of that for a couple of days and went with color and feeling...


Painting 124, "Bird in Deep Night" is simple and primitive...just night colors and a sweet sleeping bird. I didn't use standard shadows...made the bird flat so he's not too real.
(Oil Pastel, 9x12 Arches Cold Pressed 140 lb Paper)


Painting 123, "Happy June Cherries" follows the same theme...color and feeling...simple and primitive. Again, no real shading...I wanted the bird flat with energy (can you tell I had just devoured TWO chocolate "fundraiser" bars? Happy February Chocolate was coursing through my veins...).
(Oil Pastel, 9x12 Arches Cold Pressed 140 lb Paper)


Painting 122, "Golden-crowned Kinglet in Autumn" is a bright and watery watercolor, but I controlled the second wash in the background by limiting the palette to red and yellow with a heavy pigment load. This painting started as a realistic painting, but I was dead tired and the paintbrush had a life of it's own...going heavy handed after the first detailed pass and then just pouring on color (I don't know why I chose red and yellow...thinking back, it might have been my brain's attempt to grab some energy to try to wake up!)
(Watercolor, 12x16 Arches Cold Pressed 140 lb Paper)


Painting 121, "Golden-crowned Kinglet in Monochrome"...no detail...no color. I did this in minutes with two watercolor pencils and a water brush--no under sketch, using just a bit of negative space to define his belly with a cast shadow. I was at Matty's tennis clinic and was drawing in my sketchbook when this simple little Golden-crowned Kinglet popped to mind. I'm so glad I'm not afraid to paint and sketch in public anymore--thanks to the challenge!!
(Watercolor Pencil, 5x7 Arches Cold Pressed 140 lb Paper)


Painting 120, "Four Turquoise Hummingbirds" 
...a super fun test painting! Rick gave me a bunch of Daniel Smith Iridescent and Duochrome watercolor paints, and I wanted to see if they really were iridescent. Guess what...they are!! You can't see it in the scan, but the painting fairly glows in the light with every color reflective. I did heighten the reds in the flowers with a bit of regular watercolor, but the iridescent paint underneath still shines through.
(Iridescent Watercolor, 9x12 Arches Cold Pressed 140 lb Paper)

This painting is part of the 100 Painting Challenge. If you want to make art a regular part of your life...join up! This is my second year of the challenge. I'm working on 500 paintings in five years.

Friday, February 25, 2011

There are no words for this one...

...because I laugh every time I look at it.

Mr. Wide Jaws is funny enough, but it’s the contemptuous look on his sibling that really cracks me up. I always imagine “Nice, Junior…” running through her head, followed by "you're so immature."

A young Tricolored Heron sticking out his tongue with jaws open wide!

(Photo from June 13, 2010--Pinckney Island NWR, Hilton Head, SC)

Tuesday, February 22, 2011

Golden-crowned Kinglets in the snow...

I saw this little Golden-crowned Kinglet along the Little Miami River on January 30. It was cold that day, and snow lay thick across the woods. Winter birds were scattered in pockets along the trail, and their calls traveled easily on the sharp, frigid winds slicing down the hillsides. I was nearing the end of my walk and could see the Kings Powder Factory up ahead when the soft peeps and seets of one of my favorite birds caught my ears. It only took a few seconds for this female to come into view.

Painting 119. Golden-crowned Kinglet in the Snow
Watercolor, 12x16 Arches Cold Pressed 140 lb Paper

I love this view...it's not telling because you can't see her little golden crown, but it's there. She and several other Golden-crowned Kinglets foraged up and down a bank of dead honeysuckle branches located just yards off the trail. She moved so fast, and by then my fingers were so cold I couldn't get clear photos, but that's okay...a fuzzy photo can make a lovely painting.

Painting 118. Golden-crowned Kinglet Looking Up
Watercolor, 8x15 Arches Cold Pressed 140 lb Paper

I really just wanted a wisp of a painting for this Golden-crowned Kinglet...no detail...no fuss...just sweetness and winter.


The pencil sketch and study for painting 119.
I drew it on Feb 4 while waiting for Matty in my car.

The pencil sketch and study for painting 118.
These were both quick studies and I completed them in about 10 minutes.


p.s. I wanted to thank everyone for all the wonderful birthday wishes! I've never had that many in my LIFE! I finished off the day painting these happy little birds...a perfect end to a perfect day!

Your eyes are like cherries...

...which for must of us would not be a complement, but for our beautiful Tricolored Heron, it fits perfectly! It also fits perfectly with today because it's George Washington's birthday...and we all know about George and his cherry tree!

A beautiful Tricolored Heron stalks the waters at Ibis Pond on Pinckney Island NWR in Hilton Head, SC.

With all the juvenile Tricolored Heron photos I've posted, you know there have to be a few adults around! This adult was across the mote fishing in the shallows. I was sitting up on the hill watching him. The heat was intense that day...so bright and wonderful. The humidity was outrageous too...to be in the heat and humidity now! (These photos are from June 15, 2010.)


Sunday, February 20, 2011

More Hoodies...

Painting 117, Hooded Warbler After the Storm
Watercolor, 12x16 Arches Cold Pressed 140 lb Paper

Painting 117, Hooded Warbler After the Storm, grew out of Painting 116 (below) and Painting 115 (the previous post). In 116 I was trying to figure out the bird's posture. Since I didn't have a reference photo I knew I had to create another practice piece to test out what was in my head. After I finished the practice oil pastel and went back to study it, I could see I needed to make a few changes before I started the watercolor. I changed the position of the bill and the wing, enlarged his eye (Hooded Warblers have the largest eyes of all the Wood Warblers), flattened out his head a bit, tightened up the angle down his back a little...then changed the position of his bib and filled out his chest too, but I liked the rest of the pose so I stuck pretty closely with the position of the tail and legs. I'm glad I did the oil pastel as a practice because it was fun and let me see what worked and what didn't. I used the same watercolor techniques in painting 117 as I did in painting 115 (the 7x10 practice watercolor of the Hooded Warbler). I'm glad I did that practice painting too because I learned so much from it. I used a lot more wet on wet with the leaves in this painting, and I like these leaves better than those in 115. Painting the Hooded Warblers of Shawnee State Park has been a huge learning process!

Painting 116, Hooded Warblers...Thank Goodness They Sing Loudly
Watercolor, 12x16 Arches Cold Pressed 140 lb Paper

Before I started painting 117, I played around with this one. I chose oil pastels because you can scribble, scribble, and scribble some more. They are freeing and fun...and super messy, which can also be fun. I wanted some green energy floating around in my head before I started the more complicated watercolor, and this painting did the trick. All of the practice paintings and pencil sketches really help...

...does this guy look familiar to you? I did a similar painting for the challenge last year (Painting 84, Hooded Warbler in the Deep Woods, Come Out and Sing so I can Find You!). Painting 116 will work as a companion piece to that painting. When I looked at that painting, I could see I gave him a bill that was too long, so that helped me draw these birds with shorter bills...everything is an evolution...

Friday, February 18, 2011

The Hooded Warblers of Shawnee...and How to use Latex Art Masking Fluid

Back in July Matty and I volunteered for a week at Shawnee State Park (posts are here) where we worked with the naturalist, Jenny (she has her own blog here) in the nature center. The last morning we were there, Jenny, Matty and I decided to do a little birding. I'm so glad we did because we spent an amazing morning watching and photographing Hooded Warblers. It had just rained and the sky was very dark, which made it all the darker under the leafy canopy of the deep woods. When these little warblers came into view, they seemed to glow electric against the shaded wet leaves.

Painting 115 - The Hooded Warblers of Shawnee with Maple Leaves
Watercolor, 7x10 Arches Cold Pressed 140 lb Paper

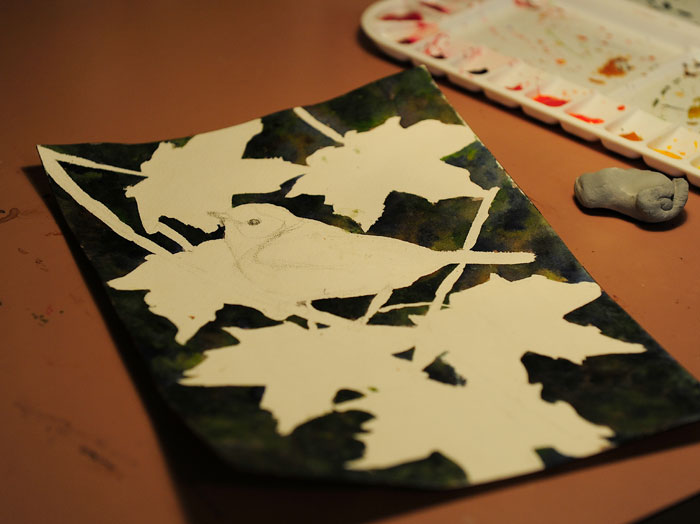
I created this painting from a memory. I lost the photo card that held all the photos from our morning of birding (so sad--I still don't like to think about that), so I had no reference photos of a Hooded Warbler to work from. I kept trying to figure out how I could recreate the wet, dark feel of the woods and the electric yellow of the warbler when a stylized image of the bird surrounded by maple leaves popped in my head. The more I thought about it, the more I liked it, and...to totally mix things up, I thought I'd try using latex masking fluid to protect the leaves so I could really create a lush, dark background. All these years, I've never used latex masking fluid. I didn't even know what it was until a year or so ago...then it sort of scared me. It seemed weird to paint something on the paper and then pull it off, and I worried it would compromise the integrity of the paper's tooth, etc., so I always avoided it. (Craziness...I know.) So I went to the art store and bought a bottle of Windsor and Newton's "Art Masking Fluid" and a bottle of Grumbacher's "Miskit" (Liquid Frisket) and some cheap brushes so I could experiment. I had already drawn a bird and leaves on a 12x16 sheet of watercolor paper, but I thought I'd practice on something smaller, so I created this painting on a 7x10 sheet.

How to use Latex Art Masking Fluid and Miskit (Liquid Friskit)
It's so easy to use masking fluid that I can't believe I was ever afraid of it! So in case there are any other Frisket-timid painters out there, here's what I learned:

Step 1. Paint the masking fluid on the areas you want protected.
Start with a completely dry sheet of watercolor paper, and use an old or cheap paintbrush to apply the liquid. I had bought a pack of cheap paintbrushes just for the task, so I was okay there.

...since I was experimenting, I used both masking fluids at the same time to test which one was better. The orange masking fluid on the bird and the bottom leaves is Grumbacher's "Miskit" and the pale yellow masking fluid on the upper leaves is Windsor and Newton's "Art Masking Fluid."

Step 2. Immediately wash the the masking fluid off the brush with soap and water.
I'm glad I used an inexpensive brush because even though I was careful, a little of the masking fluid remained gummed up in the bristles. I read that you can dip the brush into soapy water before applying the masking fluid to the brush to protect the bristles, but it's so easy to use a cheapy brush...and it's guaranteed!

Step 3. Make sure the masking fluid is completely dry, and then...paint...paint...paint!
I have to admit it was easy painting this background because I didn't have to be careful when working around all the leaves...it was fast and fun!

...for the first wash I laid in Neutral Tint and Burnt Sienna...and let it dry.

...the next wash was Sap Green and Ultramarine Blue.

Step 4. Remove the latex masking.
Rub a kneaded eraser over the masking to pull it away from the paper. You can remove all of it with an eraser, or you can gently pull on it once you get it started and peel it off. I had luck peeling some of it off, but most I had to remove with an eraser, probably because I left the masking fluid on a little long. I had to run out and didn't get back to the painting for about 10 hours. It was easy enough to remove, but I bet it could have been easier if I hadn't waited so long. The instructions say you have up to 24-48 hours, but next time, I'm going to remove it as soon as the watercolor dries. Also...the instructions say to keep the paper with the latex masking on it away from extreme heat and cold (don't let it sit in the sun).

...if you're curious...both the Art Masking Fluid and the Miskit performed exactly the same. They both were easy to apply, and one did not come up easier than the other. It might have been a little easier to see the Miskit because it was orange, but other than that, they were interchangeable. (...and the paper was not compromised at all. It held up to the water and pigment just fine...)

...the painting with the latex masking removed. It really works...and is soooo simple to use!

After I painted the rest of the painting I went back and lifted some of the pigment from the background. It just seemed too dark and drew away from the bird. I simply applied water and blotted with a tissue. This painting is part of the 100 Painting Challenge. If you want to make art a regular part of your life...join up!

P.S. SPRING is in my yard!! The Red-winged Blackbirds flew in on a warm breeze last night. Thank goodness! (In 2009 they arrived a week earlier...post is here.)

Wednesday, February 16, 2011

The baby Tricolored Heron with the pale bill...

This little Tricolored Heron had two nest mates. Of the three he was the only one with a completely yellow/pale bill (actually, he was the only Tricolored Heron on the island with a completely yellow/pale bill). At first I thought he might be the youngest of the brood, and his bill was still pale because of that, but I looked it up in The Birds of North America Online and found that by day 11 the upper mandible is dark gray. It also says that by day 24 the head, neck and body are covered with reddish feathers, so it looks as if our little guy is at least 24 days old. I guess our little Tricolored Heron is just a bit different...sort of like Rudolf (but I'm not going to call him that!). Are there any experts out there that know about pale bills on Tricolored Herons?

A young Tricolored Heron with a pale bill.

When I first found him in the camera's lens I did a double-take. None of the other Tricolored Herons of similar size had yellow/pale bills. He was beautiful and I kept coming back to him (and I took many more photos of him than the other two because he was so interesting).

His bill was a bit smaller than the other two herons' bills, and he might be a touch smaller too, but mostly all three were close to the same size.

"Pale Bill" and his two nestlings with dark gray bills.

I still have several fun photos from Pinckney Island in Hilton Head, SC to post from our trip last June, so I'll keep popping them in now and then. These were photographed on 6/13/2010, and it was very warm!! (Click here for all of the 2010 Pinckney Island posts.)