Up where I live, the Little Miami River is speckled with rocky beaches and is held captive by cliffs and towering hills of woods and dolomite outcroppings. Near its headwaters upstream, it flows through even steeper gorges carved out by glacial meltwater. The dolomite cliffs at Clifton Gorge in Yellow Springs are so steep they create a microclimate that allows hemlock trees and white cedars (
boreal relics from seeds swept down and deposited by the Wisconsinan continental glacier 10,000-15,000 years ago)
to thrive in the cooler, shaded forests of the gorges. Further down the river, near me, Fort Ancient is the largest ancient earthen hilltop enclosure in the world, perched on land that rises 240 feet above the river, and its narrow rocky and muddy corridor keeps the water moving along swiftly, but after the river flows past the stretch I walk and canoe or kayak, its banks and bottom slowly start to change until mile after mile, the gorges disappear and the land flattens out. As it flows through Cincinnati and nears its mouth at the Ohio river, the Little Miami widens and the banks and river bottom become more sandy, and sandbars can be found here and there too, moving and shifting each year with the rains and currents. This newer habitat creates an ideal playground for Midland Smooth Softshell turtles...
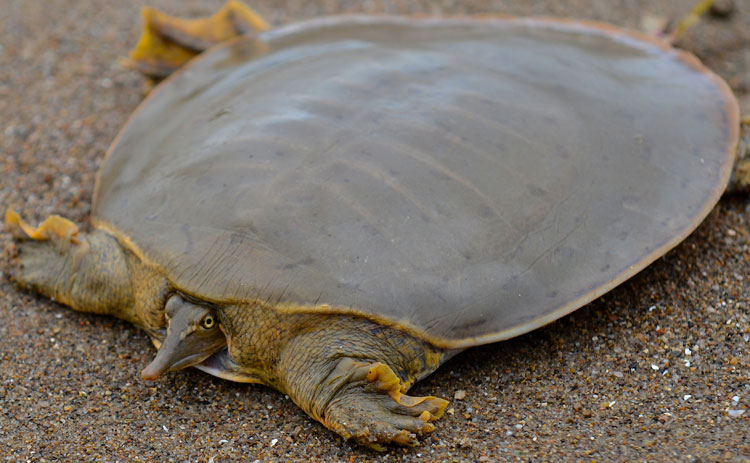
Midland Smooth Softshell Turtle (Apalone mutica mutica)
A male Midland Smooth Softshell Turtle rests in the sand along the Little Miami River at Armleder Park in Cincinnati. Here, where the river nears its confluence with the Ohio river, the river bottom and banks are sandy and support a population of smooth softshell turtles. Paul Krusling knows where the smooth softshells live in the Little Miami, so two weeks ago I met up with Paul and Joe at Armleder to photograph this guy.
Last summer, Rick and I kayaked and canoed the Little Miami river many times always hopeful we'd see a Midland Smooth sunning on a log, but we didn't. The habitat was not right. The rocky, muddy corridors and river bottoms do not appeal to the smooth softshells. Eastern Spiny Softshell Turtles, however, love the parts of the Little Miami we paddled on, and we saw well over 30 turtles. There is just enough sand mixed in with the mud for them to thrive, but two weeks ago, I finally saw my first Midland Smooth Softshell in the Little Miami (
up until then, all the smooth softshell turtles I photographed were from the Great Miami River, a much larger and sandier river). Paul and Joe were heading to Armleder Park, so I met up with them to photograph the Smoothy.
At first glance, the two softshell turtles look a lot a like. They are both flat like pancakes (and are sometimes commonly called pancake turtles) and have carapaces with no scutes--thus the "soft shell" (scutes are the armored, bony plates that make up a turtle's carapace--the upper shell.) You can also see the carapace bones through the soft shell of both species, but when you look closely, differences emerge and are easily recognizable.
Midland Smooth Softshells (Apalone mutica mutica) have an apricot or peach-colored stripe that runs from the nose, through the eye, and down the neck. Eastern Spiny Softshells (Aplone spinifera spinifera) have a yellowish stripe. I was surprised at how "peach" mutica's stripe really was!
...another color to look for...blue! If you turn a Midland Smooth Softshell turtle's foot over, you'll find a blue pad. It's quite a surprise!! Here Paul held the turtle upside down so I could snap off a quick shot. The brave turtle didn't seem to mind.
...and talking about feet. Look at that webbing! Apalone mutica mutica is a very fast swimmer--the fastest swimming turtle in our area. Of course, the Spiny softshell has webbed feet too, but not quite as extensive. The Spiny Softshell turtle can bite and is more aggressive than this Smooth Softshell turtle. Maybe being just a little faster in the water makes up for the more passive nature of the Smooth Softshell turtle, which doesn't bite. Another noticeable difference...Smoothys have less noticeable markings on their legs.
A very visible difference between the two species relates to their namesakes! As you can see here, the Smooth Softshell turtle has no spines or ridges at the edge of the carapace. It's smooth! The Spiny Softshell turtle has spines and bumps (click here to see the spines of a Spiny).
I have more photos of this fellow and a video of him swimming away in the water too. I'll work on getting them posted soon.