Thursday, December 27, 2012

"How did you come up with that idea?" ...and winter roost boxes for the birds...

I had nine people ask me how I came up with the idea for my Christmas card "Chiggy decks the halls" this year, so I thought I'd show the process. Sometimes an idea pops right in my head, and I know exactly what I want to paint, but this year I wasn't so lucky. I was panicking because I only had a few days to create my card, and I had tons of ideas in my head but couldn't get anything to solidify. When that happens, I step back, get out the pencil and just sketch. Creating lots of tiny sketches that take only seconds to draw warms you up and lets ideas flow out. I did have a little direction in mind when I started: "Chiggy" was a favorite bird of my Aunt Pat, so to keep her in my heart this Christmas, I let lots of little chickadees appear on the page...

...when your brain is frozen, start drawing tiny sketches that take only a second or two to complete. It helps warm you up and lets your ideas flow.
...tiny sketches of chickadees done quickly helped me zero in on an idea for my Christmas card. I knew as soon as I drew the chickadee on the birdhouse in the bottom-right corner I had my design.  
Even though I knew my card design would be based on a birdhouse with a chickadee and a wreath, I didn't know exactly what it would look like, so I got out a few pieces of scrap paper to start developing the idea. First came Chiggy with an ornament...

Scrap paper is a great way to develop ideas. You don't care what happens to the image if it is on a piece of paper headed for the recycle bin!
Scrap paper is great for developing ideas. You don't care what your sketch looks like when it's on a piece of paper headed for the recycle bin, so you're free to experiment. The ornament in this sketch just didn't feel right, so I put it aside and pulled out another scrap of paper...

Pencil sketch for idea #2. It didn't work. It just didn't look like something Chiggy would do!
...this design was a little better. Still, the ribbon didn't work. I liked the bird on the left side holding a sprig of holly...but...

Pencil sketch for idea #3. It didn't work either.
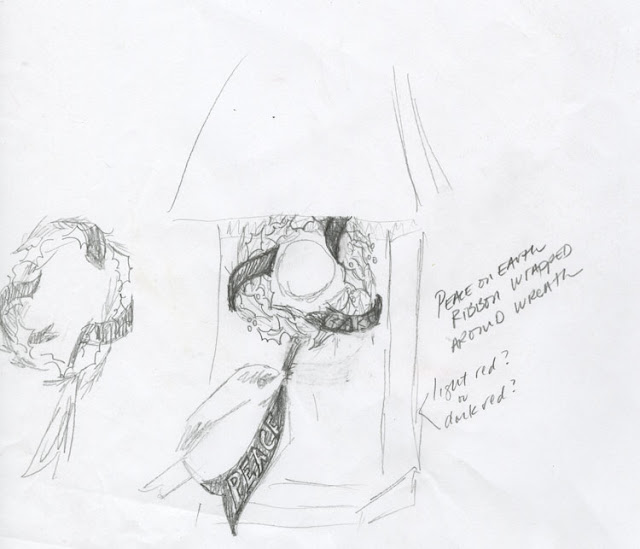
...I went back to the ribbon idea. Maybe if he was pulling the ribbon around the wreath...but it still wasn't right.

Pencil sketch for idea #4. I like it. Nice and simple and even "likely."
...finally went back to the sprig of holly. It was more natural and seemed like something a Chiggy might do. But the idea of Peace on Earth was still in my head....maybe a ribbon on top like a banner....but nahhh. Just didn't work. It was best to keep the image simple and focus on the holly and pine rope. That image told a story and said it all.

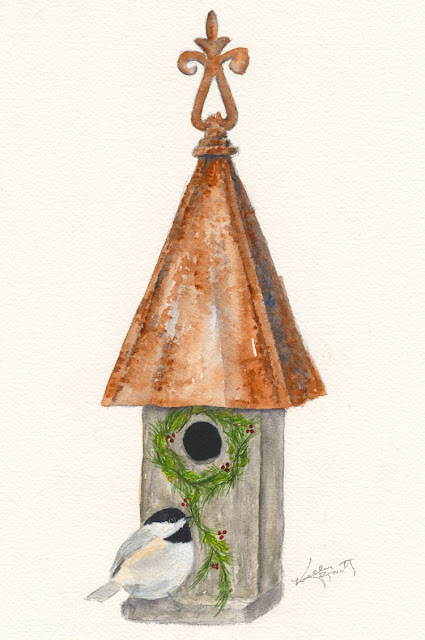
The first stage of this year's Christmas card, "Chiggy Decks the Halls." Original watercolor painting by Kelly Riccetti.
...the first round of watercolor. Normally I don't scan the stages of my paintings, but when I'm not sure where to go next, or I'm worried I might ruin it, I often scan as I go.

The second stage of this year's Christmas card, "Chiggy Decks the Halls." Original watercolor and gouache mixed-media painting by Kelly Riccetti.
...a second layer of watercolor to soften up the roof, add a bit of detail to the wood, and add the dark night sky; followed by gouache highlights on the white feathers and the green leaves, plus a rough layer of dark orange colored pencil on the rusty roof for a bit of texture. 

The final version of "Chiggy Decks the Halls," an original watercolor and gouache mixed-media painting by Kelly Riccetti.
...then the snow...first a watered-down splatter of white gouache to add depth, next snowflakes painted in a thicker mix of gouache to create the mid-field view, and finally dots of snow in a much thicker and brighter mix of gouache to bring them to the foreground...and that's the final painting. 
So if you're trying to design a card and the creative part of your brain is frozen, don't panic. Start drawing images that take only a few seconds to complete. Don't think about them, just let them flow from your pencil. Drawing quick little images warms you up and melts the frozen part of your creative brain.

p.s.
Does anyone recognize the birdhouse I used in the card? If you've ever been to a Southern Living party, you might have seen it in the catalog. I bought it years ago at a Southern Living party, and it sits out on my deck. Often when I draw a birdhouse, it's what pops in my mind. I love it's vintage style and the way the roof has rusted...

...the model birdhouse for this year's Christmas card. I bought it at a Southern Living party years ago.
Our Southern Living birdhouse...well weathered and beautiful.
p.p.s.
I hate to admit it, but even though I finished the painting on time, my card didn't go out on time (my cards still haven't gone out). I was swamped at work, and I got sick. Boo! My cards are going out as Happy New Year cards this year. Maybe I'll tape a 2013 banner on the roof...

one more thing....in winter, cavity nesting birds (like our little chickadee) use roost boxes to help them conserve heat and make it through the long, cold winter nights. Click here for a post explaining the importance of roost boxes and how to make them.

Tuesday, December 25, 2012

Chiggy decks the halls...and don't forget winter roost boxes for cavity nesting birds!

A Christmas Chickadee is stringing boughs of pine and sprigs of holly on his house to make the season bright! Original watercolor by Kelly Riccetti.
...according to Chiggy no doorway is complete without boughs of pine and sprigs of holly!

Wishing you the happiest of holidays 
filled with love and cheer.

Merry Christmas!


Winter roost boxes for cavity nesting birds...
In reality, you wouldn't see a chickadee using a birdhouse as a nest box during the winter (of course, you wouldn't see a chickadee hanging pine rope on one either!), but you might see a chickadee venturing into a small roosting box on a cold winter's night. Many cavity-nesting winter birds roost together at night to conserve heat in roost boxes. Bluebirds, titmice, winter wrens, and white-breasted nuthatches are all known to roost communally and will even use birdhouses as a roost box, but chickadees roost individually and prefer tiny crevices or very small roost boxes to help them conserve heat and make it through long frigid nights.

Nesting boxes and birdhouses are open and drafty. They are designed to dissipate heat because they are used in the spring and summer when temperatures can soar. Since heat rises it only makes sense the entry hole on a nesting box is at the top of the box, but roost boxes are designed to hold heat in. They are well sealed and have the entry hole at the bottom of the box. Communal roost boxes are designed with multiple shelves or perches staggered throughout the box. Click here to download instructions and plans from the Missouri Department of Conservation on how to build a communal winter roost box.

It's hard to find a single-bird roost box in a store, so you might need to make a tiny roost box for a chickadee if you want one (or 10) in your yard. Scott Shalaway, in an article titled "A winter roosting box for chickadees is a tight spot" (click here), suggests making a small roost box with the inside dimensions of four inches wide, three inches deep, and three inches high...with an entry hole of 1.25 inches at the bottom of the front panel. He doesn't supply the plans, but it doesn't seem too hard.

Cynthia Berger, in an article titled "Providing Birds with Cozy Winter Roosts"(on the National Wildlife Federation's site, click here), talks about cavity nesting birds using birdhouses and roost boxes in the winter. Bluebirds do not roost on perches. They like to clump together at the bottom of a nest box, so you might want to winterize a few birdhouse nest boxes for the bluebirds. She also reports that a zoology professor named Chuck Kendeigh did an experiment (research was performed from December 20, 1949 to January 11, 1950) to confirm winter roost boxes really do help birds survive freezing temperatures. He found that during the day when the bird was not in the roost box the temperature was the same inside as it was out, but at night, the temperature inside the roost box rose from 18 degrees outside to 29 degrees inside. The colder the outside temperature, the greater the difference in warmth inside. He concluded that winter roost boxes really do help winter birds brave the cold.

For a detailed account of how Black-capped Chickadees survive northern winters, check out the book Wild Bird Guide: Black-capped Chickadee by Susan M. Smith (page 69). I love this book! You can order it on Amazon, here

Sunday, December 16, 2012

More Anhinga photos; spread-wing posture and feather closeups...

...continued from the previous post, Anhinga closeups: those crazy Anhingas.
If you read the previous post, you know this bird came very close to where I was sitting and started drying out his feathers. Originally he was sunning himself on a branch in the water, then hopped on shore near me. After a while he returned to the branch. If I didn't know better, I'd think he wanted to make sure I could photograph all of him instead of just the closeups of his face. His look back at me seems to say, "Are you getting this?"

An Anhinga perched on a branch in the spread-wing posture sunning himself.
A beautiful Anhinga looks over his shoulder at me while I photograph him.
"Yes, Mr. Anhinga. I'm getting it..."

An Anhinga sun bathes while he dries his feathers. He's on a branch in Lake Thomas on HHI.
An Anhinga sits in the spread-wing posture as he continues to dry his feathers. 

...even when dry, an Anhinga will sit in the sun with wings spread to capture the sun's warm rays.
Anhingas sit in the sun with their wings spread even when they are dry because they also use this posture for thermoregulation. 
Anhingas and cormorants both use this posture to dry their feathers, but Anhingas rely on the posture to help keep them warm too. Anhingas have low metabolic rates and high rates of heat loss from their bodies. This is why you don't find many Anhingas up north. They need the sun's warming rays to survive. According to Stanford University (click here for the article), dry Anhingas use the spread-wing posture when the ambient temperature is cool but the sun is shining brightly. They sit with their backs to the sun for optimum heat absorption. Why don't cormorants do this? Because they don't have to. Their feather structure is different. Although both have "wettable" feathers allowing them to lose buoyancy so they can dive and swim under the water to hunt for fish, only the outer part of a Cormorant's feathers becomes waterlogged. This creates an insulating layer of air next to the skin when the bird is under water.

Closeup of an Anhinga's feathers.
Anhinga's feathers become wet all the way to the skin. Anihingas use the muscles in their skin to make the feathers stand on end to help them dry.

Closeup of the interior of an Anhinga's wing...the sun is shining through feathers.
The sun shines through the wing feathers on an Anhinga (interior view) creating an amber glow.

Close-up photo of an Anhinga's feathers. The small feathers on top look spiky because the muscles are holding them up on edge, to help them dry.
...small feathers "standing on edge" make the upper part of this Anginga's wings look spiky.

Water Turkey and Snakebird are two common nicknames of the Anhinga.
"Water Turkey" is one of an Anhinga's nicknames. It's easy to see its origin...the striped pattern and light tips on a spread Anhinga's tail resemble a turkey's. It's other nickname, "Snakebird," is easy to figure out too. When an Anhinga's body is submerged and only its shiny, wet head and neck are visible above the water, it looks like a black snake swimming along (click here for a photo in a previous post).

...I have another post on this fellow in the works. It focuses on the beautiful pattern of white feathers on the back of an Anhinga's wings. I photographed this bird on June 14, 2012 while we were on our vacation in Hilton Head, SC. I was sitting on the bank of Lake Thomas in the Sea Pines Forest Preserve on Hilton Head Island.

This is the second of three Anhinga posts:
Part 1: Anhinga close-ups
Part 2: More Anhinga photos; spread-wing posture
Part 3: The silver feathers on an Anhinga's wings

Saturday, December 8, 2012

Anhinga closeups...

Anhingas are amazing birdsand very exotic to northern girls who don't get to see them up close very often. It's understandable then that I was stunned when this bird plopped down beside me as I sat near Lake Thomas in the Sea Pines Forest Preserve on Hilton Head Island. He had been drying his feathers on a branch sticking out of the water when I first saw him, but I wasn't paying much attention to him then. I had a map in front of me, and I was trying to figure out where a roost of Yellow-crowned Night Herons were. Suddenly, he made a gangly jump-flight and landed about 15-20 feet away from me, like he just wanted to drop in and say "Hello..."

Head-on close-up photo of a wet Anhinga (Anhinga anhinga). Love this face!
Hello Mr. Anhinga. Charmed, I'm sure...

I really wanted to find the Yellow-crowned Night Heron roost, but adrenalin from the excitement of an unexpected encounter helped me focus my mind on the anhinga and soon washed away all thoughts of the night herons. I was more than happy to drop the map on the grass and just sit beside this incredibly cool bird. With his long, snaky neck and sharp dagger-like bill, it was hard to take my eyes off him...

...while still dripping with water, this Anhinga sat beside me to dry himself in the evening sun.
The sky blue skin on an Anhinga's face is striking. I'm not normally close enough, however, to see it so clearly! This bird landed about 15-20 feet away from me as I was sitting beside the lake.

...because Anhingas can not waterproof their feathers, they look a little shaggy and waterlogged when wet. Until the sun's heat can dry their feathers, it's also hard for them to fly well.
Anhingas lack oil glands, so they can't waterproof their feathers like ducks and other water birds. His scraggly, wet-dog-fur looking feathers definitely need some attention. A soft fluffy towel to dry off with would have been nice, but the sun and heat did the job just fine. 

...since they have no insulating feathers either, Anhingas require warm temperatures to survive. We don't see many Anhingas up here in Cincinnati.
He immediately struck up his famous feather-drying pose, and looked around. A few small bugs here buzzing near his face, and he'd shake his head now and then and snap at the tiny insects.

A male Anhinga hanging his feathers out to dry...

Why do Anhingas hold their wings open to dry their feathers?
You might already know about why these birds do not waterproof their feathers. If you don't, click here for a post I wrote last year on Anhingas that explains why waterlogged feathers help Anhingas by reducing their buoyancy so they can swim and fish under water.

...and if you haven't seen it yet, head over to 10,000 Birds to read Nate Swick's I and the Bird post on Cormorants, Anhingas and Darters.


I photographed this fellow on June 14, 2012 while we were on our vacation in Hilton Head, SC. It's about time I started posting some of the beautiful South Carolina birds we saw back then! Another post on this guy is in the works...

p.s. I never did find the Yellow-crowned Night Heron roost!

This is the first of three Anhinga posts:
Part 1: Anhinga close-ups
Part 2: More Anhinga photos; spread-wing posture
Part 3: The silver feathers on an Anhinga's wings

Sunday, December 2, 2012

It's a crossbill winter!

Once a month, I'm a contributor on the "Birding is Fun!" blog. This was my November 25, 2012 post...
Here in Cincinnati (as in other midwestern cities) we're excited because crossbills have moved down from the north for a winter visit. Both Red and White-winged Crossbills are being reported daily at local cemeteries, so since Matty was off school the Wednesday before Thanksgiving, we headed up to Miami Cemetery near Caesar Creek State Park in Waynesville, OH to see what we could see...

White-winged Crossbill at Miami Cemetery near Caesar Creek and Waynesville, OH.
A White-winged Crossbill was waiting for us when we got out of the car! 
We didn't even have to look for the birds. As soon as we stepped out of the Jeep, three White-winged Crossbills flew in the huge Eastern Hemlock tree right next to us. Their chittery flight chatter gave them away, and we quickly focused in on them with binocs. This was a life bird for Matty, so he studied them carefully. "Wow! You really can see their crossed bills!" was the first thing out of his mouth. "I know...amazing" followed out of mine. We watched them in silence as they moved from cone to cone, separating the bracts and extracting the seeds with their tongues. "Wow..."

White-winged Crossbill (at Miami Cemetery near Caesar Creek and Waynesville, OH) holds an eastern hemlock cone in its bill.
A White-winged Crossbill holds an eastern hemlock cone in its bill...
While we watched them, we tried to figure out how they were cracking open the cones to get to the seeds. We could see them working the bracts apart, but had no idea how they were using their crossed bills to do it. Later that night, I got a few of my bird books down to see if I could find out. The answer was easy to find and was in the first book I opened. Bernd Heinrich, in his book Winter World, offered an explanation. He wrote that a crossbill's upper bill is two centimeters long and crosses over a one-half centimeter shorter lower bill. To open a cone bract, the bird inserts a partially open bill into a bract, then closes its bill. When closed, the bill tips separate the bract laterally by about 3 millimeters, just enough for the bird to open its bill slightly and use its barbed tongue to dip in and grab the seed (Heinrich, Winter World, page 37).

A White-winged Crossbill perches high in the branches of an Eastern Hemlock tree. You can just make out the crossed bill in this photo.
White-winged Crossbill high in an Eastern Hemlock Tree. You can just make out his crossed bill in this photo. 
Eventually, Matty went off looking at tombstones and did a few rubbings to try to figure out dates and names on the oldest and most weathered stones,  and I did a quick sketchbook entry to record our day. We had been to Caesar Creek earlier for a picnic lunch and had seen lots of birds, but the White-winged Crossbills stole the show. In 2009, White-winged Crossbills showed up for a while in Cincinnati, and it was exciting too, but this year, the irruption is much bigger. I can't wait to see what else winter brings!

Pencil sketches and sketchbook entry of White-winged Crossbills by Kelly Riccetti
...sketchbook entry completed in the field. It was very warm that day...65 degrees F. 
To round out the post, I did a quick watercolor of one of the White-winged Crossbills we saw that day. I can't wait to get back out to see if more of these interesting birds are around. If you haven't done so already, you might want to pop over to the ABA Blog to read Nate Swick's post, "Help Monitor the Red Crossbill Invasion" (click here). You also might like Jim McCormac's post (click here) for a photo of a White-winged Crossbill's long tongue as it nabs a seed.

White-winged Crossbill in an Eastern Hemlock Tree. Original watercolor by Kelly Riccetti
White-winged Crossbill in the Hemlock Tree
(watercolor sketch)

This part wasn't in my original "Birding is Fun!" post, but after reading Matty's field journal entry from that day, I thought I'd include it here...
Nov 21, 2012, Miami Cemetery (near Caesar Creek)
I had been thinking as I walked through the cemetery that everybody buried here had a story, but for most, the stories had been lost to time. I knew none of them, but I wanted to, so I set out to identify one of the most weathered and dilapidated gravestones I could find--the gravestone of someone who had been forgotten. I took a rubbing, and slowly a name started to show through, "Wife of Prof. J. W. Stewart." The gravestone next to the little weathered and unreadable gravestone was large and not nearly as weathered, "Prof. J. W. Stewart" stood out clearly. At least I knew a little bit more about the forgotten grave, but not a lot. I wondered what Prof. Stewart taught, so I did a quick search on my phone to see if there were any records out there, and amazingly a reprint of a newspaper article from July 25, 1907 from The Western Star of Lebanon, OH popped up. In the article, I was able to find out 
Prof. John W. Stewart was the first African American mayor of Harveysburg, and his wife was Virginia Singleton of Harveysburg! So the little weathered and forgotten gravestone belonged to Virginia. 
There are always connections, there is always significance to be found in the insignificant.                                   Matthew Riccetti.   

Click here for a link to the reprint of the newspaper article from The Western Star of Lebanon, OH from July 25, 1907 about Professor John W. Stewart, the first African American mayor of Harveysburg, OH.

Angel statue at Miami Cemetery near Caesar Creek in Waynesville, OH--where the White-winged Crossbills were.
Angel statue at Miami Cemetery in Waynesville, Ohio.

Tuesday, November 27, 2012

How to make a ceramic pottery hummingbird ornament out of clay...

These ceramic hummingbird ornaments are simple and fun to make. You can make them into ornaments to hang on your tree or to hang on a hook in your garden or in a potted plant. You can also tie beautiful ribbons on them to decorate a package, or even put a grouping together to make a wind chime. Anyone can make them…just follow these easy steps and have fun!

Ceramic pottery hummingbird ornaments fresh out of the kiln. It's an easy clay art project. Just follow these steps.
A flock of Ruby-throated Hummingbirds fresh from the kiln waiting to have festive ribbons tied on them!

Step 1: Grab the clay!
Start with a lump of clay. High fire or low fire, it doesn't matter. Your teacher can help you pick out the best clay. If you are going to make wind chimes or an outdoor ornament, however, high fire clay is stronger and will tolerate temperature fluctuations better.

Step 2: Roll out the clay!
You can put the clay through an extruder or roll it out with a rolling pin. I use a canvas wrapped board with guides on the edge to guarantee I get an even thickness:

A rolling pin on a canvas wrapped board with guides will help you get an even thickness when you roll out the clay.
...use a rolling pin to roll out the clay (or an extruder if the studio has one).

Step 3: Cut out the hummingbird shapes.
Use the following pattern to get the basic outline, then place the pattern on the clay and cut out the bird shape using an exacto knife, a needle tool, or a pointy clay stylus:

Free hummingbird pattern
Use this hummingbird pattern to cut out the shapes. You can make the pattern as large or as small as you like.

Step 4. Smooth out the cutouts.
Take a wet sponge and smooth out the edges. Cutting with a pointer or Exacto knife can leave a jaggy mess, so go over the clay with a damp sponge to smooth everything out:

Smooth out the rough edges of the clay cut-outs with a sponge.
...smooth out the rough edges of the clay hummingbird cutouts with a damp sponge. 

Step 5: Punch a hole in the top.
You can use a special hole puncher made for clay or just use the needle tool and gradually widen the hole:

Punch a hold in each clay hummingbird shape. You can punch the hole in the top wing, or near the head like I've done here.
...don't forget to punch a hole in each clay cutout!

Step 6. Let it dry...and wait...
One trick when working with flat clay cutouts is to use small boards of drywall. Place the cutouts on a flat piece of drywall board first, then place another board on top of the cutouts to keep them from warping as they dry. It can take up to two weeks for clay cutouts to dry completely, but when they are thin (1/4 to 1/2 inch) they usually dry within a week.

Step 7. Bisque fire the cutouts.
Your teacher or studio owner will bisque fire the cutouts when they are ready. Bisque firing changes the clay into ceramic material. When the cutouts come out of the kiln, they will be hard and white...and ready for glazing!

Step 8: Glaze the hummingbirds.
You can use any style when you glaze the hummingbirds, whether it’s detailed and realistic or modern and sketchy. I wanted these to be fun, colorful and carefree, so I went with a sketchy style that can be painted in a just a few brushstrokes:

The easiest way to glaze the hummingbirds: 1. Glaze the back and wings green.   2. Glaze the belly white.   3. Glaze the chin red.   4. Finally, outline the bird in black.
Use any style to glaze the hummingbirds. I used a sketchy and fun style for this batch. The bright red and green look great on a Christmas tree or as a package ornament.    
     Follow these steps to paint the hummingbirds:
          1. Glaze the back and wings green.
          2. Glaze the belly white.
          3. Glaze the chin red.
          4. Finally, outline the bird in black.

Step 9. Fire it again!
After the second fire, they are good to go. Have fun decorating packages, making ornaments, or making a wind chime.

p.s. You can do this with cookie dough too!  ....or you can use any cookie cutter on clay.
...and I've already had three requests for other patterns: a chickadee, a cardinal, and a bluebird. I'll see if I can create a few more patterns tonight.

How to make three other easy clay bird projects
To make a ceramic pottery bird's nest with removable eggs, click here.
To make a ceramic pottery bird feeder, click here.
To make a ceramic owl or owl ornament, click here.

Friday, November 23, 2012

The beautiful common persimmon...tasty and it can predict the weather too!

Common Persimmons (Diospyros virginiana) are such exotic-looking little fruits. They ripen late in the season, slowly turning a pale orange and then darkening to the burnt orange of harvest...

A common persimmon (Diospyros virginiana) still clings to a branch. Photo from 10-13-2012 in Greenbo Lake State Park in Kentucky.
An almost-ripe common persimmon clings to the branch in the cool autumn air... 
...but don't be tempted to pluck one off the tree and just bite into it. Start with just a tiny taste to make sure it's ripe. Unripe persimmons  are horribly astringent and will suck all the moisture out of your mouth. Descriptors such as "furry," "bitter," "horrible," "god-awful," or just plain "puckery" are common. The best description of all, however, goes to Captain John Smith of the Jamestown colony. In 1612 he wrote, "If it be not ripe, it will drawe a man's mouth awrie, with much torment; but when it is ripe, it is as delicious as an Apricock." If that isn't enough, also in 1612, William Strachey, who wrote Historie of Travell into Virginia Britania, also talked about the lovely fruit and said, "...when they are not fully ripe, they are harsh and choakie, and furre a man's mouth like allam...." This little fruit definitely makes an impression (source: an in-depth article on the history of the common persimmon in the New World, click here for the .pdf of "The common persimmon (Diospyros virginiana L.): The history of an underutilized fruit tree (16th-19th centuries)," by C. H. Briand.)

Common Persimmons among autumn leaves.
...beautiful autumn leaves and apricot-colored persimmons from October 13, 2012 at Greenbo Lake State Park in Kentucky.
Why are persimmons so astringent when unripe?
Persimmons, whether ripe or unripe contain tannins, which are naturally occurring chemicals that "bind and precipitate proteins" (click here for a detailed description of tannins by Cornell University). When persimmons are unripe, the tannins are diffused freely in the fruit, which means they are "unbound" and will react to to the proteins on our tongues and in our saliva by causing the proteins to coagulate (sucking all the moisture out of our mouths and causing the furry feel that accompanies the horrible drying). When the fruit is ripe, however, the tannins are "bound up" and cannot react or coagulate. Unripe bananas also have a lot of tannins, as well as red wine that has not been aged, and nuts too. Now I know why every now and then I get that dry feeling in my mouth after eating a walnut out of the shell.

If you want to teach your kids about astringency in fruits and plants, click here for an experiment that teaches how to "unpucker" the persimmon. This experiment is labeled easy and is good for grades 5th - 8th. Specifically, it teaches kids how tannins can be bound up (or "defanged") using an iron solution. (Holy cow. I did not know any of this, but even worse, it seems any 5th grader off the street does...)

Persimmons grow wild in the eastern and souther parts of the U.S. This persimmon tree was found in eastern Kentucky.
When persimmons are ripe, they are wonderful and sweet, and taste a little like an apricot. Even better, though, they can be made into persimmon bread and other yummy things. 
Persimmons have a four-lobed sepal. If it separates easily from the fruit, the persimmon is probably ripe.
The four-lobed sepal of a fallen fruit is still attached to the tree next to this persimmon. If the fruit separates easily from the sepal, it is probably ripe. 
This persimmon tree was growing in the woods at Greenbo Lake State Park in Kentucky (October 13, 2012). It was close to the lake on the trail near the lodge. What a surprise to see these beautiful apricot-orange fruits as I rounded the bend. I plucked a few off to take back to show the rest of the family, but I knew not to bite into one. Although they were a nice harvesty orange, the fruits were still too firm and not ripe enough to eat.

Persimmons are a favorite food source of raccoons, who seem to be able to find the ripe fruit easily.
...persimmons are a favorite food source of raccoons, who seem to always know when the fruit is ripe. We found lots of raccoon scat piles with numerous persimmon seeds in them on our hikes.

And now for the weather...
Folklore holds that persimmon seeds can predict the weather. Growing up in Cincinnati, we knew nothing about this amazing secret. We don't have a lot of persimmon trees here. Persimmons are mostly a southern and eastern species, and in all of my rambles, I've never come across one, so it's no wonder we were clueless to its power. It took my Aunt Pat and her family moving to Terre Haute, Indiana years ago to learn the folklore and pass it on to us, so I'm writing this post in her honor and memory. Here is the theory: when you slice open a persimmon seed, the embryo will be in the shape of a spoon, fork, or knife. Each has its own meaning:

Spoon - the winter will be rough with lots of snow. You need a spoon to shovel snow!
Fork - the winter will be light. You can't shovel much with a fork after all.
Knife - the winter will be icy, cutting and cold (yikes!). 

Did you know a persimmon seed can predict the weather? Folklore says they can let us know if it will be a snowy winter.
...a persimmon seed just bursting to let us know what to expect this winter. 
We were hoping for spoons because we love snow, so we were happy to see SPOONS...

The persimmon seed prediction guide: "spoons" predict snow, "forks" say no snow, "knives" indicate ice.
...the persimmon seeds say SNOW! The embryo on the left is definitely a spoon, which means heavy snow, get shoveling; however, the seed on the right looks suspiciously like a spork. Unfortunately, sporks haven't been accounted for in the folklore, so who knows what's up. Perhaps we will have bouts of heavy snow with days of mild weather thrown in between. We'll take that...
Take a look at the bark...
If we're doing a complete post on persimmons, we can't leave out the bark. It's famous for its look of stacked cubes. You can spot a persimmon tree in the winter  just by seeing the crazy bark (on older trees)... 

The bark of the persimmon tree is distinctive and looks like little blocks of wood.
The famous bark of a Persimmon Tree...

Bark of a common persimmon tree
...little blocks of wood stacked up in a pleasing composition. 

The Cincinnati Champion Common Persimmon tree (Diospyros virginiana) at Camargo Country Club in Indian Hill
The Cincinnati Champion Persimmon Tree at the Camargo Country Club in Indian Hill
My friend, Paul, knew immediately where a champion persimmon tree was in our area. You can see it from the parking lot of the golf course. We walked out on the course to get a closer look. The grounds keeper didn't mind...this tree is famous, huge and old and has lots of visitors...
Two lightning rods run up the Cincinnati champion persimmon tree at Camargo Country Club.
...the wires running up the sides are lighting rods. It's nice to know the grand old persimmon tree is well protected.

...this is has been a long post...but there is just so much to say about the beautiful little persimmon. It's fitting the champion tree in Cincinnati is located on a golf course. The tree is part of the ebony family and its wood is very dense and hard. Its wood was a standard for "woods" golf clubs starting in the 1900s (and you can still have persimmon woods made today, source: click here). 

Hope everyone had a wonderful Thanksgiving!

Saturday, November 17, 2012

Banding Saw Whet Owls at Hueston Woods...wow!

Last Saturday evening I headed over to the Hueston Woods Biological Station with my friends Paul Kruesling and Joe Kappa to watch Northern Saw Whet owls (Aegolius acadicus) being banded by Drs. Jill and Dave Russel with the Avian Research and Education Institute (AREI).  Have you ever seen a Northern Saw Whet owl? Can you say cute...

Northern Saw Whet Owl (Aegolius acadicus) being banded at the Hueston Woods Biological Station as part of the Avian Research and Education Institute (by Dr. Dave Russel)
Northern Saw Whet Owl (Aegolius acadicus) 
Cuter than cute can be, but this little night bird is a lethal hunter and can dispatch prey in one swoop and strike. 
Northern Saw Whet Owls are the smallest owls in eastern North America. They are rarely seen because  during the day, they sleep in conifer tangles, and if they are disturbed by a human tramping past, they do not flush. Their defense is to remain motionless, and it works. Northern Saw Whet Owls posses disruptive coloration (a camouflage pattern consisting of contrasting light and dark patches, spots or stripes), and it works best when the animal is still.

Is that bird tame?
Because Saw Whet Owls' primary defense is to remain motionless, they appear to be tame, but don't be fooled. They really are wild birds (just ask a mouse). Their "tameness" however, is legendary, and researchers report of being able to walk right up to one and pick it up off a branch. The diminutive owl is so calm around humans it appears to have no fear and even seems curious about us!

A very polite bird, the Northern Saw Whet Owl almost appears tame as Dr. Dave Russel lifts her up so we can see her.
...those eyes, those fluffy feathers, that tiny little rectangular body....there's no doubt this pint-sized nocturnal hunter graduated from the Institute of Cute, but looks can be deceiving--there's might and fright behind all of that fluff...  
You may wonder how researchers capture these tiny owls. It's pretty cool. They select an area in the woods with dense stands of conifers and set up huge mist nets. The nets are placed near an audio player amplifying the male's territorial song. Every thirty minutes the mist nets are checked to see if an owl has flown into one. If one has, it's gently removed from the net and placed in a soft bag to await banding...

A Saw Whet Owl captured just minutes before awaits banding. The soft bags keep owls safe and relaxed. They do not bother the Saw Whets at all.
A Northern Saw Whet Owl rests in a soft bag waiting to be banded. We were able to watch Dave band three Saw Whet Owls and one Eastern Screech Owl.
A Saw Whet Owl is about to have a band placed on its leg...
...getting ready to place the band on the owl's leg. 
In addition to banding, researchers gather other data, such as the bird's weight, wing length, tail length, whether it's male or female, its age, and amount of fat deposits. It doesn't take very long to gather all this data and the little owl just watches and studies...

The tiny bands that are fastened to the owls' legs...and the calipers used to take small measurements.
...the tiny bands that will be fastened around the owl's leg were strung like beads on a fine thread. They are very light and the bird doesn't even notice when one is attached. In the background, you can see the black calipers used to take small measurements. I didn't take notes that evening, so I don't remember everything that was measured. I was too busy marveling at the patient little owl. 

Closeup of a Northern Saw Whet Owl's facial disk.
A closeup of a Northern Saw Whet Owl's facial disk shows the feathers of the facial disk are different from the feathers elsewhere on its body. Many look soft and fluffy, but others appear barbed or even skeletal. The feathers in the concave disk help direct sound to the ear openings.
As I mentioned earlier, these cute little brown and white owls with gorgeous yellow eyes are ferocious hunters and can kill their prey, often a deer mouse or a white-footed mouse, quickly and easily with their talons after a strike. Since the owls are small they usually only eat half of a mouse, storing the rest until the next meal. Also, if prey is abundant in winter, Saw Whet owls will stock up by stashing uneaten carcasses in tree holes where they remain frozen for future meals. When the owl is ready to eat from the frozen cache, it thaws out the meat by "incubating" it like an egg (source: Penn State, The Virtual Nature Trail, click here).

...the eyes of a Northern Saw Whet Owl look on patiently.

If you look closely, you can see the frayed edges of the owl's wing feathers. This unique adaptation is what gives them their silent flight. The trailing feathers are fringed and tattered and break up the sound waves generated as air flows over the top of the wings and forms downstream wakes (click here for an earlier post about Barn Owls that talks about this adaptation).

It was cold that night, but my giant snow parka kept me warm. The little owl felt like a ball of warm fluff in my hands. She was so gentle and never took her eyes off me. I can't describe how amazing it felt to hold this little wild creature. 

...being a night owl, I really appreciated getting out to see these owls, which are only passing through our area. Every fall, Saw Whets leave the northern forests where they nested and migrate south to their wintering grounds. Most have past through by the beginning of December. 
If you want to learn more about the work being done by the Avian Research and Education Institute, click here. From their website: "AREI is a non-profit organization dedicated to enhancing the preservation of avian populations. Our mission is to protect and conserve avian populations through research, education and advocacy. To this end, AREI is committed to establishing biological stations that will provide bird banding and environmental education to the public."