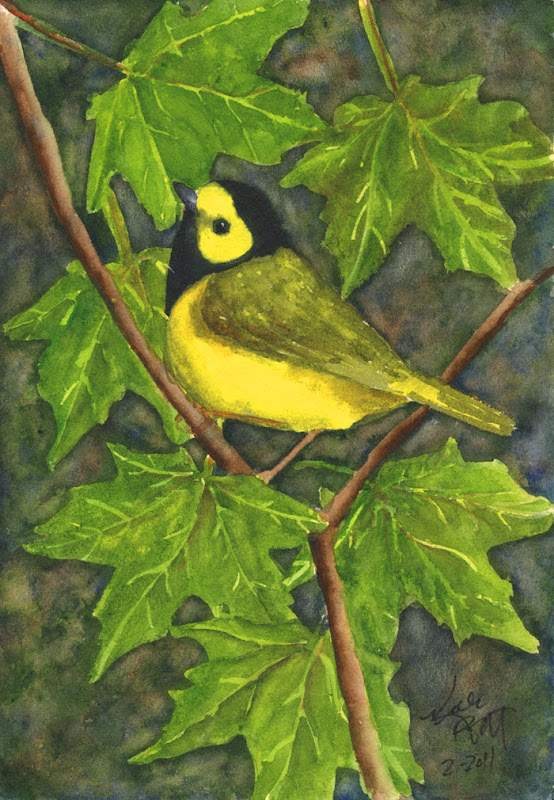
Painting 115 - The Hooded Warblers of Shawnee with Maple Leaves
Watercolor, 7x10 Arches Cold Pressed 140 lb Paper
I created this painting from a memory. I lost the photo card that held all the photos from our morning of birding (so sad--I still don't like to think about that), so I had no reference photos of a Hooded Warbler to work from. I kept trying to figure out how I could recreate the wet, dark feel of the woods and the electric yellow of the warbler when a stylized image of the bird surrounded by maple leaves popped in my head. The more I thought about it, the more I liked it, and...to totally mix things up, I thought I'd try using latex masking fluid to protect the leaves so I could really create a lush, dark background. All these years, I've never used latex masking fluid. I didn't even know what it was until a year or so ago...then it sort of scared me. It seemed weird to paint something on the paper and then pull it off, and I worried it would compromise the integrity of the paper's tooth, etc., so I always avoided it. (Craziness...I know.) So I went to the art store and bought a bottle of Windsor and Newton's "Art Masking Fluid" and a bottle of Grumbacher's "Miskit" (Liquid Frisket) and some cheap brushes so I could experiment. I had already drawn a bird and leaves on a 12x16 sheet of watercolor paper, but I thought I'd practice on something smaller, so I created this painting on a 7x10 sheet.
How to use Latex Art Masking Fluid and Miskit (Liquid Friskit)
It's so easy to use masking fluid that I can't believe I was ever afraid of it! So in case there are any other Frisket-timid painters out there, here's what I learned:
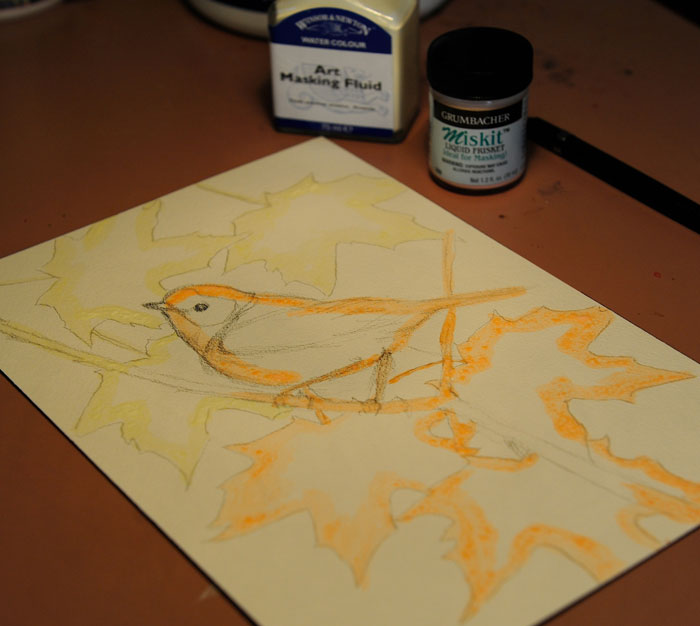
Step 1. Paint the masking fluid on the areas you want protected.
Start with a completely dry sheet of watercolor paper, and use an old or cheap paintbrush to apply the liquid. I had bought a pack of cheap paintbrushes just for the task, so I was okay there.

...since I was experimenting, I used both masking fluids at the same time to test which one was better. The orange masking fluid on the bird and the bottom leaves is Grumbacher's "Miskit" and the pale yellow masking fluid on the upper leaves is Windsor and Newton's "Art Masking Fluid."
Step 2. Immediately wash the the masking fluid off the brush with soap and water.
I'm glad I used an inexpensive brush because even though I was careful, a little of the masking fluid remained gummed up in the bristles. I read that you can dip the brush into soapy water before applying the masking fluid to the brush to protect the bristles, but it's so easy to use a cheapy brush...and it's guaranteed!
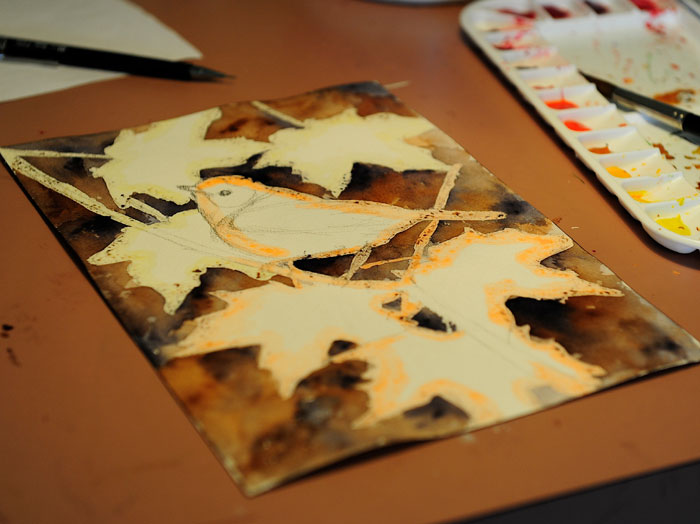
Step 3. Make sure the masking fluid is completely dry, and then...paint...paint...paint!
I have to admit it was easy painting this background because I didn't have to be careful when working around all the leaves...it was fast and fun!

...for the first wash I laid in Neutral Tint and Burnt Sienna...and let it dry.
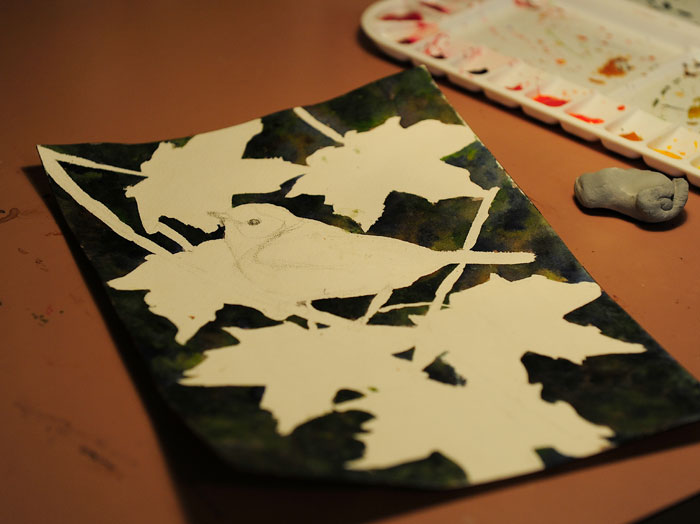
Step 4. Remove the latex masking.
Rub a kneaded eraser over the masking to pull it away from the paper. You can remove all of it with an eraser, or you can gently pull on it once you get it started and peel it off. I had luck peeling some of it off, but most I had to remove with an eraser, probably because I left the masking fluid on a little long. I had to run out and didn't get back to the painting for about 10 hours. It was easy enough to remove, but I bet it could have been easier if I hadn't waited so long. The instructions say you have up to 24-48 hours, but next time, I'm going to remove it as soon as the watercolor dries. Also...the instructions say to keep the paper with the latex masking on it away from extreme heat and cold (don't let it sit in the sun).
...if you're curious...both the Art Masking Fluid and the Miskit performed exactly the same. They both were easy to apply, and one did not come up easier than the other. It might have been a little easier to see the Miskit because it was orange, but other than that, they were interchangeable. (...and the paper was not compromised at all. It held up to the water and pigment just fine...)

...the painting with the latex masking removed. It really works...and is soooo simple to use!
After I painted the rest of the painting I went back and lifted some of the pigment from the background. It just seemed too dark and drew away from the bird. I simply applied water and blotted with a tissue. This painting is part of the 100 Painting Challenge. If you want to make art a regular part of your life...join up!
P.S. SPRING is in my yard!! The Red-winged Blackbirds flew in on a warm breeze last night. Thank goodness! (In 2009 they arrived a week earlier...post is here.)


Hi Kelly, This is awesome. Thanks for so much wonderful information... Love your painting --and not just that sweet little bird, but especially the leaves. FABULOUS!!!!! Thanks so much for sharing.
ReplyDeleteHave a wonderful weekend.
Hugs,
Betsy
Tanks for the lesson - nice also to know about how each product was to use.
ReplyDeleteGreat art and info.
ReplyDeleteThat was a terrific art lesson! The painting is gorgeous, and that masking effect is really something. You are just tooooo talented.
ReplyDeleteI've never heard of masking fluid, but it looks like magic. Your painting is wonderful.
ReplyDeleteWhat a great "how to"! And lovely, lovely painting!
ReplyDeleteIve just read through your very interesting post Kelly, but the line that excited me most was ' A warm Breeze' that just sounds sooooooo good at the moment !! :-)
ReplyDeleteThat was fascinating. I had no idea how that is done.
ReplyDeleteBeautiful result, too!
I really enjoyed that Kelly, your step by step instructions were so clear, now...if only I could draw... ;)
ReplyDeleteGreat news on the Red-winged Blackbirds too!
Loved the picture..you have a great memory!
ReplyDeleteSpring is "winking" at us too. The piles of snow are almost gone and I've seen some green shoots of flowers staring to pop up close to the garage.
That is a good demo on using masking fluid. I would have kicked my shins for losing the memory card.
ReplyDeleteHi Kelly ..adorable your from memory Warbler and it has a real lush look to it!!
ReplyDeleteWhat an interesting technique you used. I found it very interesting and I can't even draw a straight line lol.
Wonderful paintings and ideas. Great talent you have, dear Kelly. Hugs.
ReplyDeleteAnother beautiful painting, Kelly! It's great that you are trying so many new techniques. The challenge has been very good for you. How sad that you lost that memory card. Maybe it'll show up in some strange place. If I tuck something away in a different place than usual, it can stay lost for a long time.
ReplyDeleteLovely painting! Thanks for the lesson - will have to share this with my mom, who's been wondering about using masking fluid.
ReplyDeleteThats very interesting Kelly, I have never researched the use of it before. I guess it beats having to scrape unwanted paint off with a knife.
ReplyDeletegreat info - thanks! lovely bid painting
ReplyDeleteWow... I continue to be fascinated by your work... I want to learn to at least draw so bad. Every time I try, I become discouraged. You are so talented! The painting is very, very nice!
ReplyDeleteAnother great piece of art! Interesting to learn how you did it.
ReplyDeleteOh! Hooded Warblies!! I need spring!
ReplyDeleteI must confess - I have it on my shelf and have never used it! I love your painting and thank you for the instructions. I will be trying it soon!
ReplyDelete...thank you, everyone! What a learning process--I loved it. I don't think I'll always use Miskit, but I will definitely be using it more and more. I just used it again on today's watercolor. It really does help...
ReplyDeleteMatty and I are going back to Shawnee State Park this summer to volunteer. I hope to get some photos this year without losing the memory card... If so, I'll have to see how my memory and the real bird measure up!! Thanks again for all the kind words...
Kelly, you are so awesome to share all these steps with us. It is so exciting to consider not having to fiddle with all the edges of things by using a mask like this. Although when I have to be careful I end up creating new backgrounds... so I guess they both have a place. But you can bet a mask will be on my art list. Your painting came out wonderful!
ReplyDeletePS I did not realize the other post had a link to this post, because it is in the same color as the entire paragraph. Thank you for telling me.